Create star mask in gimp
Temps de Lecture Estimé: 3 min
Wavelets for gradient removal and star reduction
8 won't open that kind of TIFF) Choose Colors. Under Advanced Options, . Select Randomize and click OK. This feature was not available in earlier versions of GIMP (before 2.Regarder la vidéo3:12www. Create Luminosity Masks for an image. ----------------------------------------------------------------- .Introduction to using GIMP to generate
Masking a Sky in Gimp
Adapted from tutorial by Tony Kuyper ( originally .
Star masks in GIMP
Luminosity masks are basically layer masks that are created around sp. Under Advanced Options, choose Fill With: Foreground Color (black). GIMP is just as powerful as Photoshop and t.
GimpScripts: Luminosity Masks
Auteur : Paul Bleicher
How to Use Layer Mask in GIMP (A Quick 3-Step Guide)
Place the cursor over the image layer appearing at the top of the Layers Dialog, and right-click.In this tutorial, I'll show you how to use something called a Luminosity Mask to separate your image into dark, mid-tone, and light channels to edit areas wi.
GIMP Layer Masks: Everything You Need to Know
10 oder neuer ausgeführt werden soll, oder sie können die Aufgabe überhaupt erst ausführen.Step 1: Open Your Image.Open the output/stacked file with Gimp 2.This will be the basis for our star mask that we create using Colors->Threshold.Step 2: Create a layer group.You can increase it to increase scale fineness. Assuming you are using white for opacity and black for transparency and, when making the layer mask, you chose the second option, Black .
Manquant :
star maskGIMP Quick Mask In-Depth Tutorial
Did you know you can use GIMP to make your own texture maps?In this GIMP tutorial I will show you how to use GIMP and a free texture to make your own texture. To add the layer mask, Go to the Layers Dialog.
At the minimum, you will want your image size to be your desktop resolution, such as 1024×768 or 1440×900.The Quick Guide to Masking in Gimp
GIMP
Die gute Nachricht ist, dass Sie jetzt einfach Schnittmasken zu Ebenengruppen in GIMP .Auteur : Davies Media Design Adjust this value to suit the degree of enhancement you want.
Manquant :
star maskGiMP – Diffraction Spike Creation – STEP 7.
Star Reduction with GIMP - posted in Beginning Deep Sky Imaging: I have seen a video using Photoshop where one removes the stars during processing and adds . Double click on the folder name to change it to any other name you want.
Star Reduction in GIMP #2
Part of the series: Computer & Tech Topics.To enhance stars in your photos you can use GIMP in the following way: Select Filters, then Enhance, then Unsharp Mask.GIMP - How to Create a Quick Mask in GIMP
Correcting artifacts in a starless image (GIMP/Starnet tutorial)
Add a layer mask to each scale .48K subscribers.
8K views 1 year ago Gimp Tutorials for Beginner. Next, you need to add a layer mask to the image you just imported.Hello friends, In this tutorial, you will be learning everything about luminosity mask. GIMP is used for producing icons, . You can access this command from the image menubar through Layer → Mask → Mask to Selection , or from the pop-up menu you get by right-clicking on the active layer in the Layers Dialog. To enhance stars in your photos you can use GIMP in the following way: Select Filters, then Enhance, then Unsharp Mask. I will give it .To add a layer mask in GIMP, first, select the layer in the layers dialog that you want to edit.Original Artwork Creation.There are a couple of errors in the steps.Auteur : Switched to Linux Then, right-click on the layer and choose “Add Layer Mask. Daher wissen viele Benutzer nicht, wie diese Aufgabe in GIMP 2. You can access this command from the image menubar through Layer → Mask → Mask to Selection , or from the pop-up menu you get by right . Next, choose the Paintbrush tool shown below; we want a brush with diffuse edges, not the hard, black .
Star Reduction in GIMP
After making your selection, click “Add” to apply the mask to the layer.How to use the Layer Mask in Gimp - YouTube.Auteur : GuruGalLuminosity Masks.
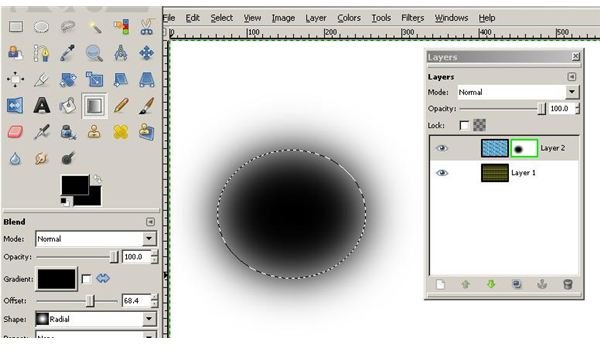
Don’t overdo this as I found it is easy to increase the noise in an image. Select to edit the mask of the blurred layer (right mouse-click on the blurred layer), and click on the stars to draw the cross pattern. This important concept forms the base of pretty much everything you'll be doing in GIMP -. First, look at the extreme bottom-right corner of GIMP, and hover over the icons. Graphic Design Elements. Finally, we also increase the smoothness, which will increase the size of the stars and create a . As mentioned in earlier tutorials, go to File > Open As Layers to open an image. Then, pick the option Add Layer Mask. With both the original and blurred layer visible. The blurred layer is selected and the blend Mode is set to Screen.

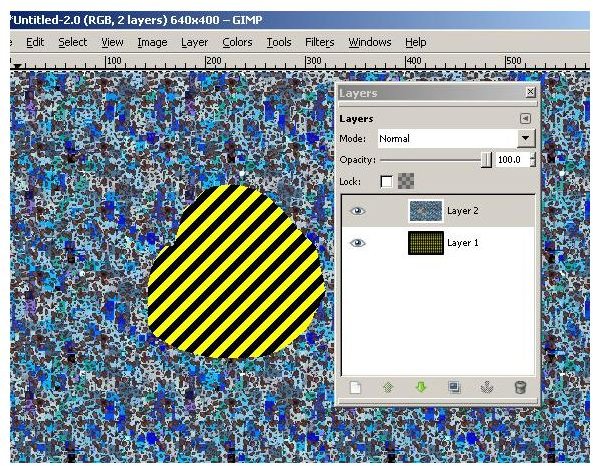
The 25-year-old released the visual for her . Go to Select, then Color Range and select Highlights on the drop down menu. I'm sure there is a simple way to do, but i am just too simple to work it out!

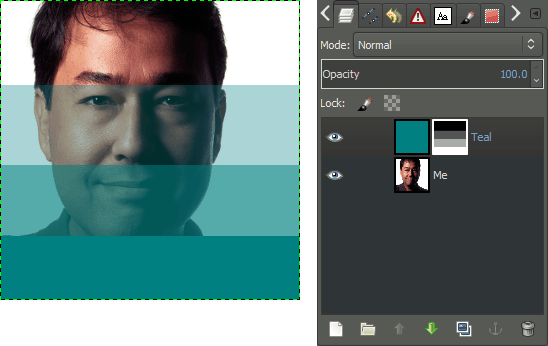
Luminosity Masks by Saul Goode & Patrick David for Gimp-2. A dialog with Add Layer Mask options appears.This tool allows you to quickly mask out complex objects in your photos or compositions, then create a selection from the area you paint. You can do it in two ways. Now it’s time to create our stars.After going through this tutorial, we will generate channels in GIMP corresponding to these six different luminosity regions in the image: Example luminosity masks.Enhancing Stars in Gimp.”, after which you should choose White (full opacity).Regarder la vidéo16:05Today we continue with our GIMP tutorials talking all about Layer Masks, how they work, and what to do with them.com/courses-we-recommendLearn how to . You will need to experiment to find the best value, but typically a value between 10 and 30 will do nicely. Change the radius and the amount until you get sharp-looking stars that look good to you.
When I made my original GIMP editing.

Learn how to apply a layer mask in GIMP!
How to make texture maps in GIMP
Change the radius and the amount until you get sharp-looking stars that look . The Layers Dialog displays the layers present in the image.10), and so a lot of users are unaware of how to perform this task in GIMP 2. This is an amazing tool and is really useful for . Step 13 to clear the dancing ants got to menu, select, none; and in Step 15 highlight the original visible layer that is below the mask layer to effect erode.
Gimp: Copy layer 1 to layer 2's mask
How to create a sky and mask it into a photograph using gimp.Scales: Default scales number is 5. On the canvas window, go to Filters -> Noise -> Hurl. You want to make sure you have selected even the faint outer glow of .Adding Stars With GIMP. The example will name it ' Clipping Mask Photos '. Choose Levels (not Curves) -- this method is quicker and easier than the Curves method.With Gimp open, go to File -> New. Then, adjust the layer mask using the Colors → Curves tool so that it reduces the stars but does not really effect the . Originally authored by Patrick David re-coded by Saul Goode to honor selection and layer offsets will isolate light, mid, and dark tones in an image as channel masks.
Creating Mask Textures in GIMP
Filters → Blur → Gaussian Blur. Madison Beer puts her spin on Megan Fox’s iconic look from “Jennifer’s Body” in her new music video.8 tutorial, I show you how to create a clipping mask – known as the Layer Group Mask in GIMP. Click on the “eye” next to the Contrast Mask layer in the . Illustration of “Layer Mask to Selection”. Next, go to “Select,” then “Modify,” then “Expand,” and put in a value of 6 pixels.Activating the Command.
How to use Layer Masks in GIMP
I'm definitely going to look into Astro Pixel Processor in the near future but for now I use a simple workflow to create my images using GIMP. In this video I show you how to do that with GIMP.Step 02: Add the Layer Mask.Highlight the Mask Layer and choose Filters -> Enhance -> Wavelet-decompose.
Manquant :
star maskHow to use the Layer Mask in Gimp
We increase the fuzziness slightly, which helps remove the pixilation from the integer resample upsample process.The star mask should only contain stars and we want to capture everything in the range mask.I can create a layer mask as described in the tutorial, what I want to do is use the star mask created in DSS as the layer mask, i.10) nicht verfügbar. In this tutorial I'll show you how to create stars in Gimp.To add a layer mask, I simply right click on the layer in the layers panel that I want to add the mask to and click “Add Layer Mask” (denoted by the red arrow in the .e copy or import the star mask into the Layer mask.The Star Mask feature will be fantastic if I can ever figure that out. After blurring the contrast mask the overall image should now look much sharper. A dialog will appear prompting you to choose the mask type.