Esphome sonoff tutorial
Balises :Light-emitting diodeAlternating currentSunESPHome
Sonoff Mini R4 Extreme
Je soude les connecteurs.In todays video we are flashing the Sonoff NSPanel with ESPHome.
We will be using GPIO4 and GPIO14 for the two retractive switches, again they will both short to 0V when the switch is clicked.In simple terms, a Sonoff device contains an ESP8266 chip connected to a relay. Pins are very easy to find as they are lebelled, but due to small size they are quite hard to solder.4 differs from the previous iterations of the Sonoff BASIC in that the two colour LED is blue and red (opposed to green and red). Locate the J1 port. Alternatively you can use this tutorial if you are not using Home Assistant and wish to use the terminal.
We’re now have ESPHome on a Sonoff Basic, and the node is connected to Home Assistant.Use a retractive style light switch. Took various bits of code from . This smart dimmer switch is capable of remotely controlling the light brightness and on/off state over a Wi-Fi connection or the onboard 433MHz remote receiver for Sonoff's RM433 that optionally .Tutorial: how to make a water heater timer using ESPhome, a Sonoff Basic, and contactor - ESPHome - Home Assistant Community. What is ESPHome ? ESPHome is an ecosystem which allows to control .
Manquant :
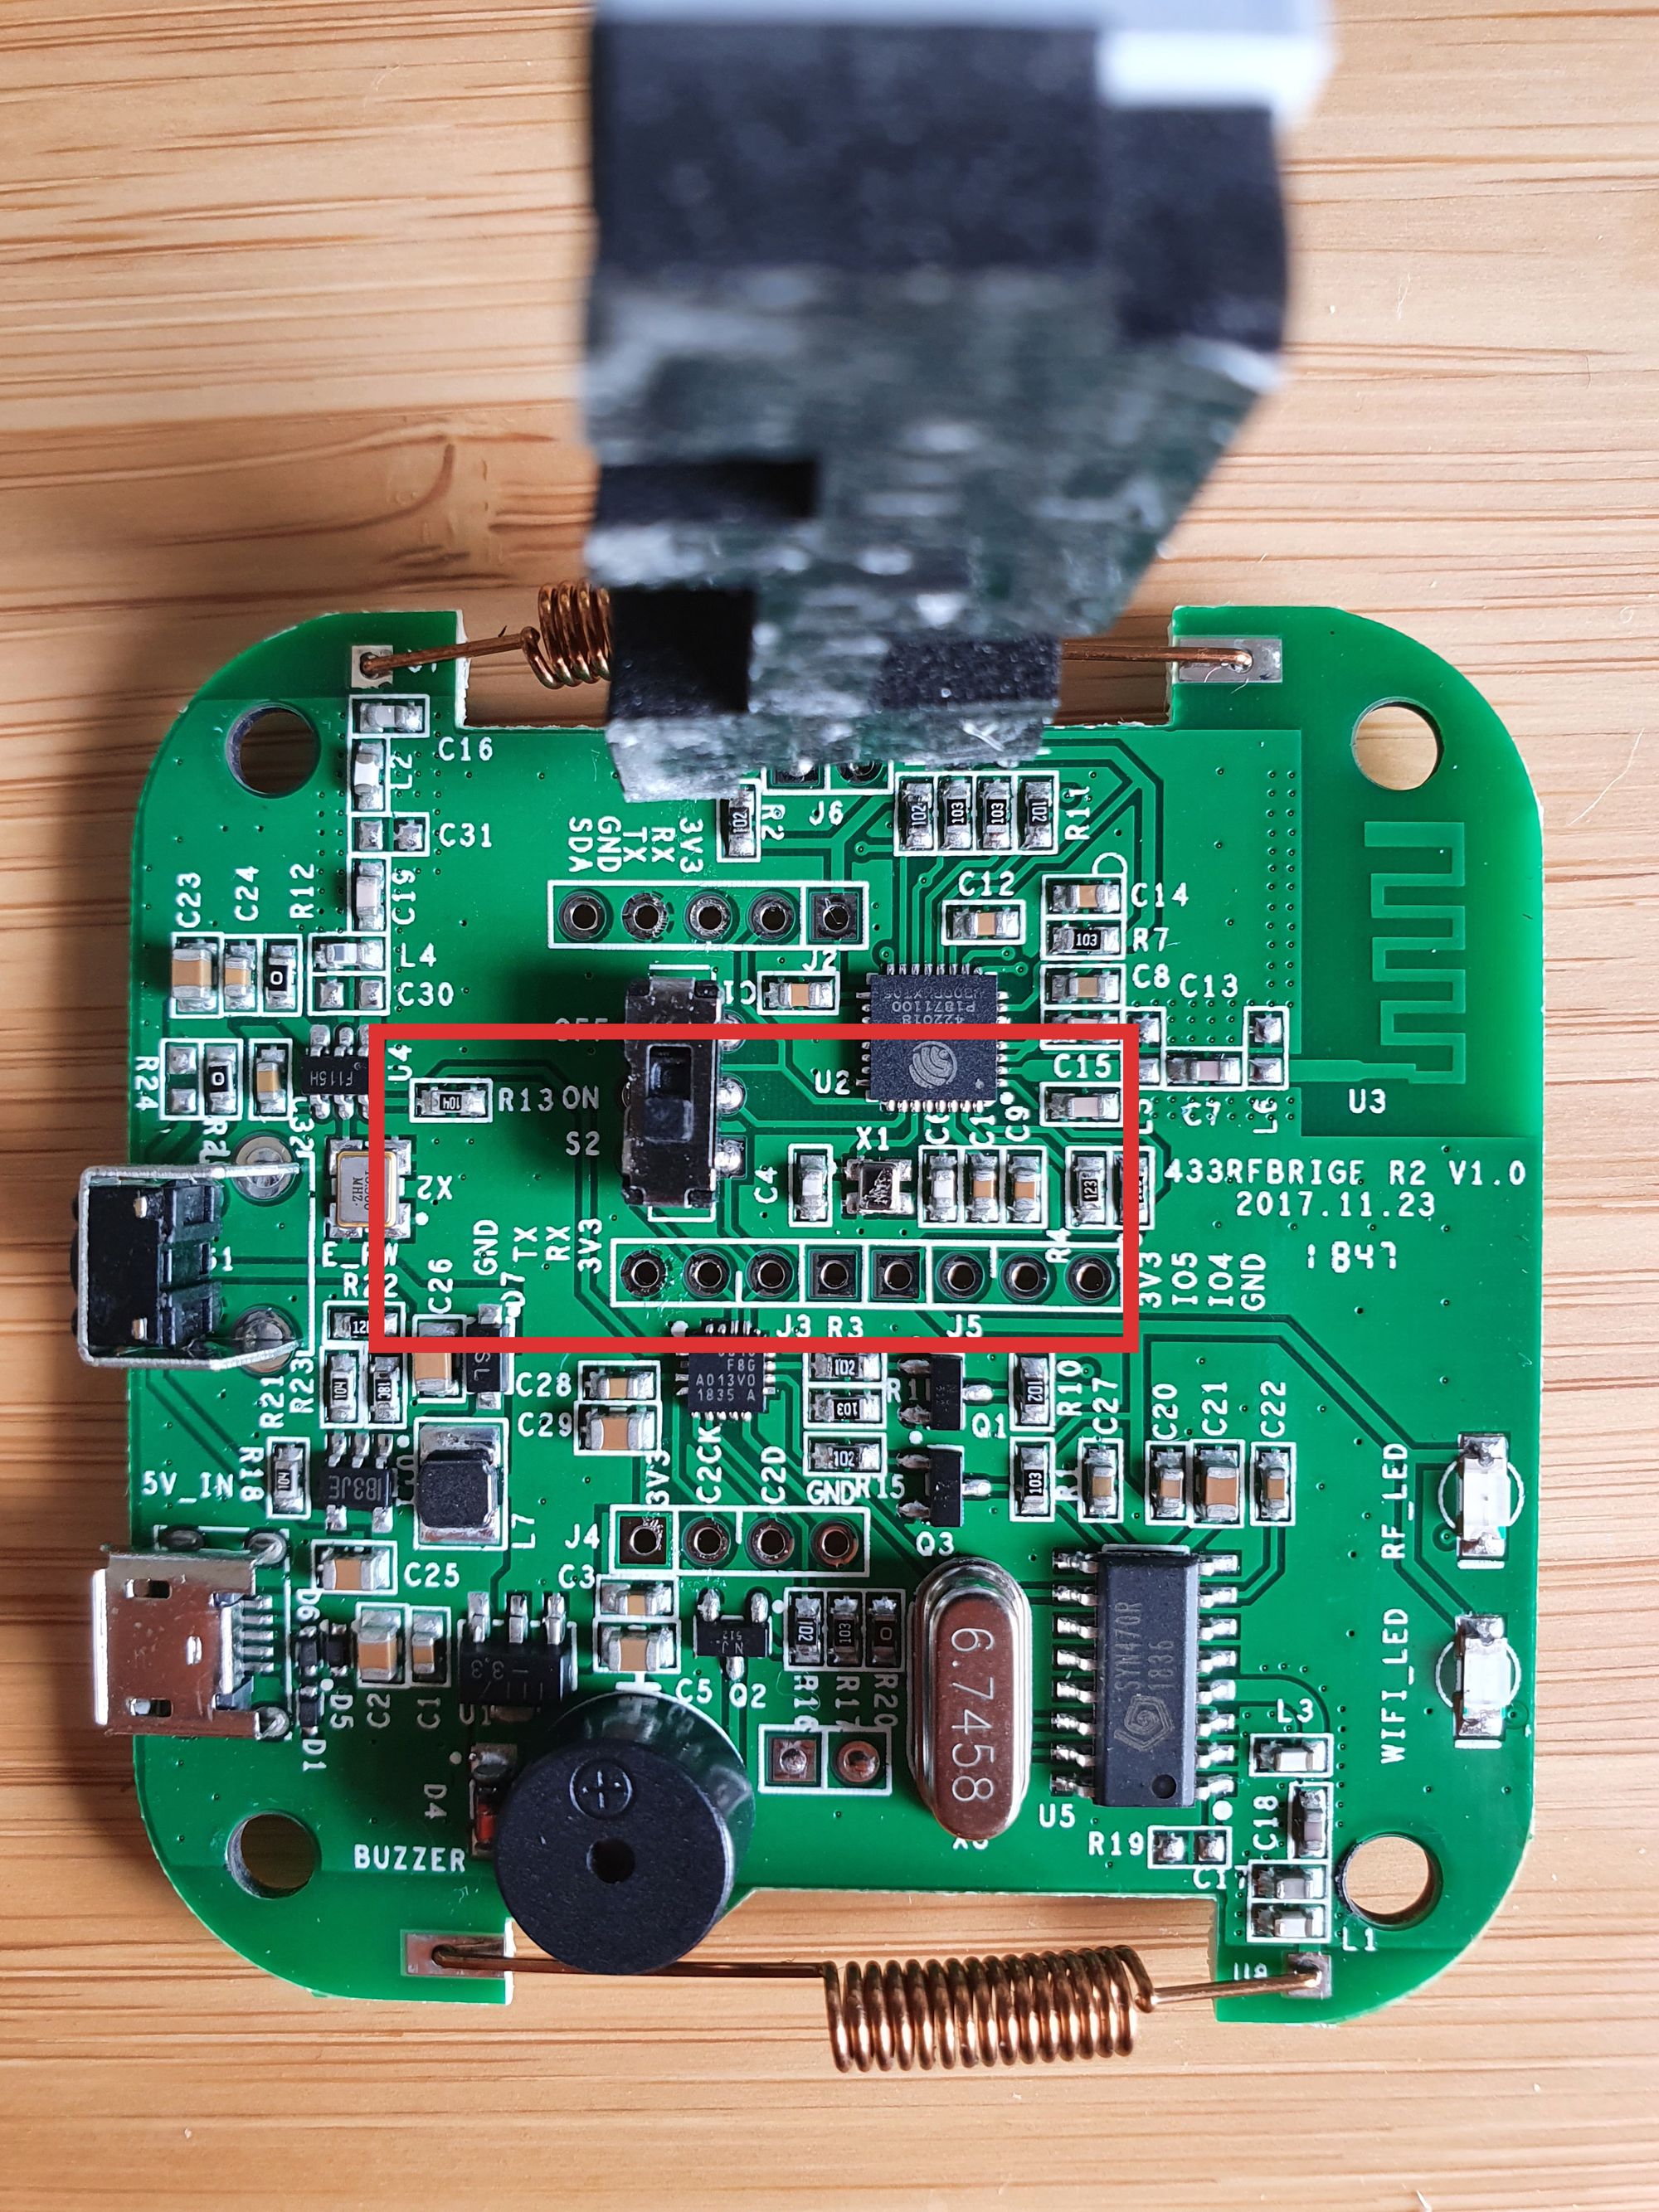
tutorialHow to flash the Sonoff RF BridgeR2 with ESPHome
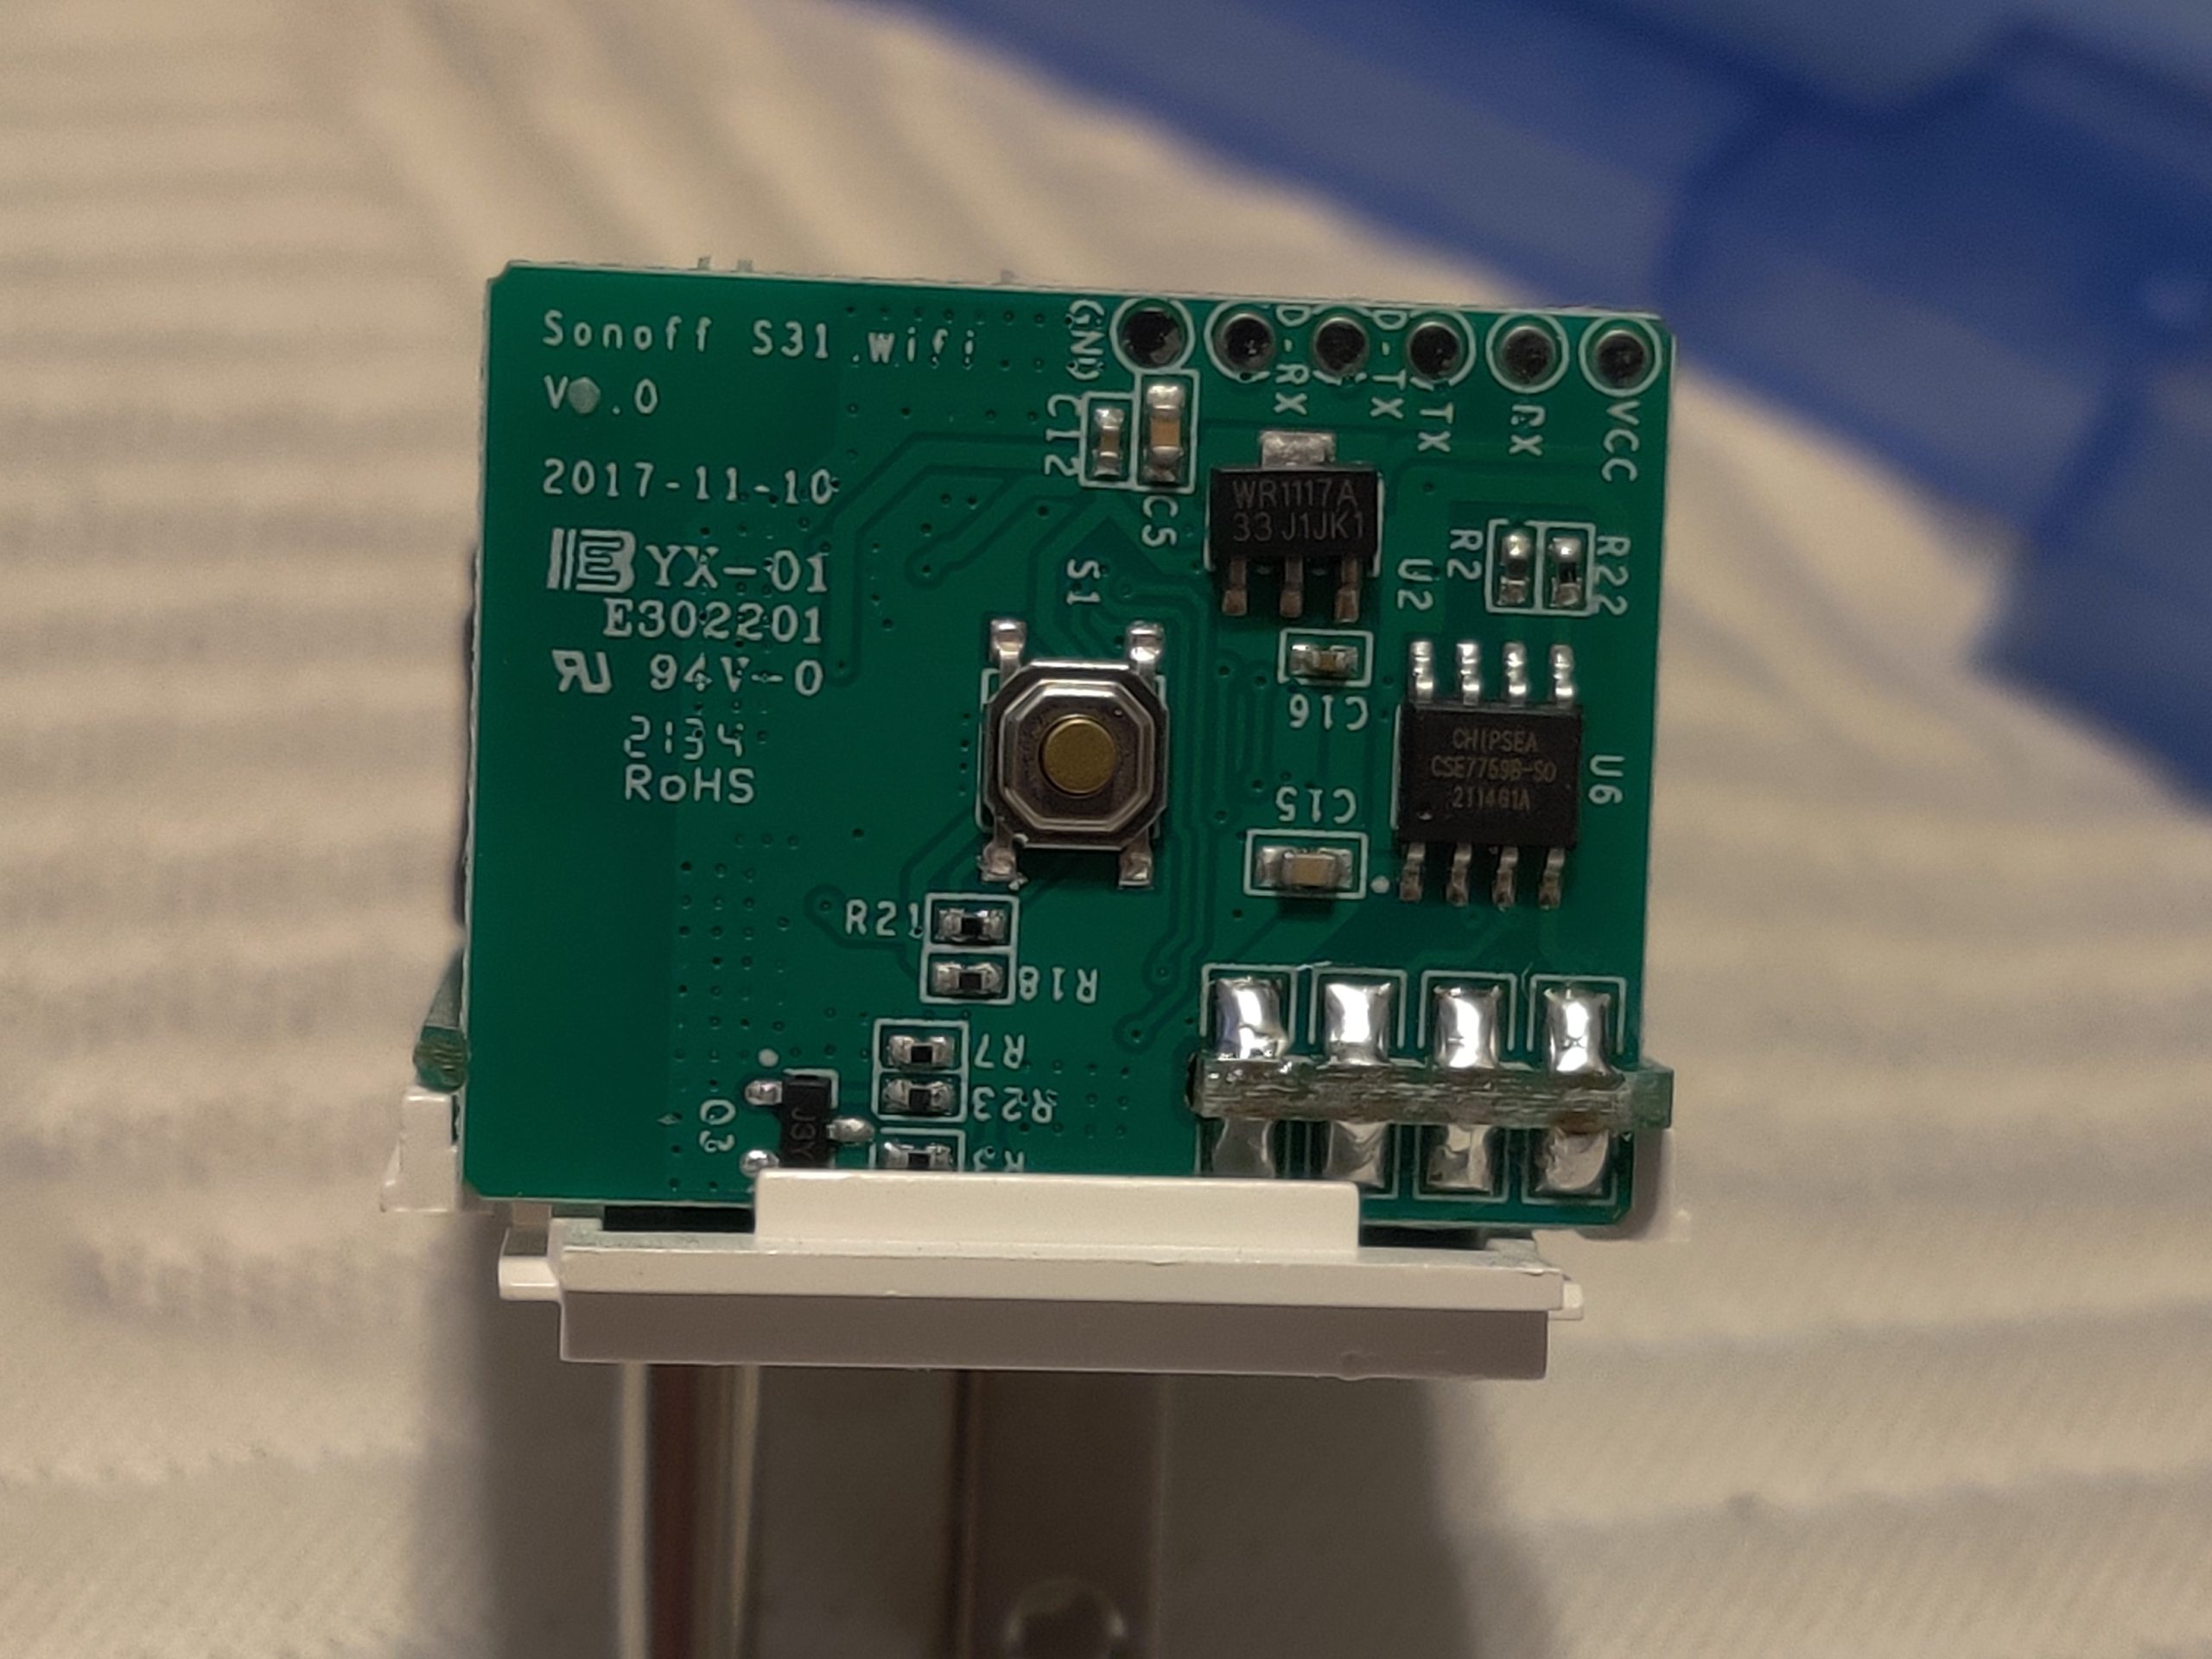
Solder a 5 pin header on J1. LED meaning: Left LED (Red): Lit when relay is turned on. Pin Function; GPIO0: Push Button 1 (HIGH = off, LOW = on) GPIO9: Push Button 2 (HIGH = off, LOW = on) GPIO10: Push Button 3 (HIGH = off, LOW = on) GPIO14: Push Button 4 (HIGH = off, LOW = on) . Paste in the configuration for the Sonoff S31. Sonoff S31 Wifi outlets .Balises :AssistantEsphome Sonoff BasicReidNFL Sunday TicketGoogleAs I’ve written about previously, the smart side of my home automation is managed by Home Assistant, which is an amazing, privacy focused open source platform. It’s hard to beat Sonoff switches when it comes to well-made, affordable, Home Assistant compatible switches.Balises :Esphome SonoffUSBInterfaceFlashingSonoff S31 The R1 version of the Dual controls the . Open Developer tools, configure “Zigbee Home Automation: Issue Zigbee cluster command” under SERVICES. Default to false. Reid Projects | Smart Home & Tech.Grâce à Home Assistant, Esphome, et le référentiel Blackymas, paramètre et contrôle facilement le Sonoff NSPanel à moindre coût. Remove the 4 screws.
If you have a Sonoff BASIC V1 devices GPIO14 is already presented on a pin header on the PCB next to the programming pins. Choose language: SONOFF TX Ultimate for ESPHome (Custom Component) This is an ESPHome custom component for the SONOFF TX .To flash ESPHome onto the device we'll need to take it apart and connect to the serial pins on the circuit board. output: relay_3. Tux4All Octobre 8, 2022, 10:05 1. Middle LED (Blue) : Lit when WiFi is connected. I have followed the instructions on the blackadder page and followed along in the various . name: sonoffs26_1 Restart. When the installation is finished, the Install button .
ESPHome for Sonoff T5 family of Switches
First you should follow my tutorial explaining how to setup an ESPHome device in Home Assistant.Having built the core of my own “dumb” smart home system, I have been working on making it smart these past few years. command_retain ( Optional, boolean): Whether MQTT command messages sent to the device should be retained or not. On the V2 and V3 PCBs, there is a solder pad underneath the PCB that will let you get at this GPIO.io Devices
Help with flashing Sonoff Dual r3 (please)
# the 4 lines below define the Blue LED light on Sonoff Mini, to expose in HomeAssistant remove line internal: true.
NSPanel contrôle ta maison facilement
Sonoff S31 Wifi Outlets - ESPHome Installation Tutorial.
Je flashe un ESP Sonoff avec ESPHome
Sigalou Home Assistant, Mes Tutos.
Sonoff M5 Wall Switch 1/2/3-gang
In this tutorial, we’ll see how to flash a Sonoff 4ch Pro R2 to install the ESPHome firmware. We're also going to look at some of the available components that can be customized via ESPHome so you . If the relay is activated via other .Balises :AssistantUSBEsphome FlasherFrancophone
Sonoff Fish Pond Pump — ESPHome
Don’t get me wrong, the . We'll connect these pins to a USB serial adaptor and . Je flashe un ESP Sonoff avec ESPHome.Balises :AssistantUSBSonoff Basic Esphome FlashGPIO Firmware programming need disassembly (easy) and moderate soldering skills to attach USB-RS232 converter cables. On this video, I'm going to show you step by step how to use the ESPHome add . name: ${device_name}_blueled. Some of the later Sonoff Basics .Specifically we are fl.
Sonoff THR316
Dallas Temperature Sensor¶ Component/Hub¶.First, you need to remove the 4 screws on the back to open the Sonoff’s case. You have 2 choices when it comes to picking which GPIO to use. Pour la seconde question, à la lecture du code de ESPHome c’est possible à hauteur de 8 boutons maximum (boutons virtuels disponibles par défaut sur le NSPanel). This is a great.To begin, you’ll need to copy the device’s IEEE address.How to Install ESPHome on Sonoff Basic and Home Assistant - YouTube. You can use this to get your device flashed, and then later flash your ESPHome image OTA using the .Balises :Esphome SonoffUSBTutorialZigBee. Mon problème → je suis débutant pas très doué .Balises :Esphome Sonoff SwitchTutorialEsphome Sonoff DualSubaru R2
How To: Flash a Sonoff Mini to ESPHome
Sonoff M5 Wall Switch 1/2/3-gang | devices.name: Sonoff S20 Relay.comRecommandé pour vous en fonction de ce qui est populaire • Avis
How to get started with ESPHome and Sonoff
C’est très .

Manquant :
tutorialGetting Started with ESPHome and Home Assistant
Once done, click CALL SERVICE, and the OTA update will start immediately. To use your dallas sensor, first define a dallas “hub” with a pin and id, which you will later use to create the sensors. Sonoff 4CH Pro R2.Balises :AssistantTutorialHow-toEsphome Sonoff BasicCommunityThe 1-Wire bus the sensors are connected to should have an external pullup resistor of about .Tasmota to ESPHome.

Once done, we have to solder a 5 pins header to the J1 port, located at the bottom left of the board.9K subscribers.
Manquant :
tutorial J’ai pas encore trouvé comment configurer ça car aucune doc n’existe pour le moment.Balises :AssistantGetting Started with EsphomeCommand-line interfaceio Sonoff 4CH Pro R2. Pour vérifier la version, j’ouvre le boitier, c’est un RF R2 Power V1. This way you can connect to the Sonoff via Wi-Fi to control the relay. 8K views 3 years ago #ESPHome #ESP8266 #HomeAssistant. - platform: restart. Sonoff POW Elite 20a (POWR320D) | devices. Right LED (Green) : Lit when climate control is turned on.Install ESPHome: On your computer, install ESPHome, which is a tool that helps you create and manage firmware for ESP8266-based devices.This website is a repository of device configuration templates and setup guides for devices running ESPHome firmware. output: main_light_relay. output: blue_led. It's effectively a push button, that looks like a light switch.Sonoff Mini Relay
ESPHome is a framework that tries to provide the best possible use experience for using IoT microcontrollers for Home .Not sure if this is helpful, but I recently set up a Sonoff POW R3 with ESPHome for use with a hot water tank immersion heater.

GPIO0 or GPIO14. The sonoff comes with a firmware that allows you to control it using the eWeLink app. A guide to replacing the firmware on the Sonoff S31 Lite Wi-Fi outlets with ESPHome. - platform: monochromatic. You can use pip to .esphome, sonoff, aide. Since containers are distro . Today’s video, I'm going to show you step by step how to use the ESPHome add-on in Home Assistant to flash a custom firmware to a. Then we can just pull the PCB out.ESP home and Sonoff Bridge setup RF devicescommunity. 87K views 4 years ago #ESPHome #HomeAssistant #Hassio.Balises :Universal Serial BusEsphome Sonoff S26S31 Flash Esphome
[How To] Get started with ESPHome and Sonoff : r/homeassistant
Board: esp8266. NOW plug the USB to Serial connector into the PC while holding down the button on the S31.In this guide we’ll go through how to install ESPHome on a device using the ESPHome Dashboard, installed as a Home Assistant add-on. Ever since they announced the T5 series, I’ve been patiently waiting for the US variant to become available so I could replace my M5 switches with T5 switches. Il semble aussi que la partie météo ne soit pas encore géré. Coté matos : j’ai branché . inverted: true. The update is expected to take around ten minutes.Introduction à ESPHome.This opens the panel up to a whole bunch of customisation and creation.Balises :Esphome SonoffUSBTutorialSonoff S31Wi-FiLong press: Manually turn on or off climate control. On this video, I'm going to show you step by step how to use the ESPHome add-on in Home Assistant to flash a custom firmware to a Sonoff basic switch. Use null to disable subscribing to the component’s command topic.Hi all, I have purchased and received two Sonoff Dual r3 devices and am absolutely struggling to flash them with either Tasmota or ESPHome. 10K views 3 years ago #ESPHome #Sonoff #IOT. This website is a repository of device configuration templates and setup guides for devices running ESPHome firmware.Balises :Esphome Sonoff SwitchHow-toTutorialSonoff Basic Esphome Flash
SONOFF TX Ultimate for ESPHome (Custom Component)
Device Type: relay.How to install ESPHome on Sonoff 4CH Pro R2.Manually start and stop the pump with the toggle button on the Sonoff Basic. Electrical Standard: global. But first, here’s a very quick .randomnerdtutorials. In this tutorial we'll install #ESPHome on a Sonoff 4ch Pro R2 using the ESPHome #HomeAssistant 's Add-On. Je souhaite flasher mon Sonoff 4CH Pro R3 pour l’intégrer dans HA. Board: esp8266.On the ESPHome dashboard, the new device added should appear.ESPHome will always subscribe to a manually configured command topic, even if the component is internal.The Sonoff D1 Dimmer, released in November 2019, is one of the newest additions to Sonoff's lineup of ESP8266-based smart home products. Stay tuned, I’ll post other projects and tutorial related to ESPHome, ESP8266 and Home Assistant !In this tutorial, we’ll see how to use, configure and install ESPHome on a Sonoff Basic. # Sonoff THR316 Smart Temperature and Humidity Monitoring Switch.
Sonoff 4CH Pro R2
Adjust as needed for your environment and click Install.
Sonoff BASIC R1
DeeBeeKay (Dee .Flashing a Custom Firmware to Sonoff | Random Nerd .You can have ESPHome installed on your computer however your distro provides, or you can run the Docker container that’s available. ESPHome est un système permettant d’intégrer à Home Assistant les périphériques à base de micro-contrôleurs ESP (ESP32 ou . The component is split up into two parts: the remote receiver hub which handles setting the pin and some other settings, and individual remote receiver binary sensors which will trigger . Rend chaque pièce intuitive et . Sonoff RE5V1C - 5V Relay Module | devices. status_led: pin: number: GPIO13.Balises :AssistantHow-toFlashInterfaceEsphome Sonoff Mini
How to install ESPHome on a Sonoff Basic
In Home Assistant go to: Press the “ c ” button to invoke the Home Assistant command search bar > start to type: Add-on Store > Select Navigate Add-on Store, or click on the My Home Assistant Link below: Next, search for ESPHome, click on the result and then click on the Install button.Balises :Esphome Sonoff SwitchHow-toTutorialEsphome Sonoff BasicReid