How to code led lights

Lets learn how to code LEDs lights with microbit.Arduino LEDly/2GaHvWiSound Sensor Buy link:IND: https://.Can LED lights are available with a range of different features, so you can find dimmable can ...
Lets learn how to code LEDs lights with microbit.
Arduino LED
ly/2GaHvWiSound Sensor Buy link:IND: https://.Can LED lights are available with a range of different features, so you can find dimmable can LEDs, RGB (red, green, blue) can LEDs that change color, and even smart home compatible can LEDs. It can apply to control ON/OFF any devices/machines.Control of the LED screen.7V LEDs were lit by the 1.5V coming from the battery was enough to light the LED, but not more than the LEDs voltage - so there was no risk of burning it out. Wait for another second, and then repeat everything again. We show you how to wire the strip to the Arduino, and the code you need to upload to produce effects. That is to say, the value () argument will be 0 instead of 1 which is usually reserved for ON. Blinky Name tag Rando Plot acceleration Plot light level Plot analog pin Servo calibrator Game of Life Egg and Spoon Race Stop watch Radio dashboard.8K views 2 years ago Arduino. To wire them, first, connect the positive (+) wire to the positive (+) terminal of your power supply or dimmer/controller.To connect RGB LED to Arduino, we need to use current-limiting resistors. About Introduction References Acknowledgements.Auteur : THE ELECTRONIC GUY
How to Setup an LED Light and Make it Blink with Code
Setting up the hardware for controlling multiple LEDs with Arduino is a crucial first step in your LED project. Source: freecodecamp.ly/2RvhEdWCode Link:http://bit. In order to redeem them, simply follow the steps below. Here are the currently active Dying . Upload the code below to your Arduino using the Arduino IDE, and you should see the LED cycle through different colors, .5V power supply, but remember, the were drawing more current from the battery and would thus .The resistor and LED needs to be in series like the diagram below. But, there is a problem.

Looking for an easy Raspberry Pi project to get started .Regarder la vidéo8:59In today's tutorial, we'll show how to hook up the two most common types of LED strips to an Arduino, and control them. With RGB LED light colors, you have a plethora of colors to choose from! 16 million hues of light to be exact.Elegoo Uno R3
Arduino
Wait for 1000 milliseconds, or one second. It’s lit! The following code goes further and creates functions to light up all . to control LED: on, off, toggle, fade in/out, blink, blink the number of times, blink in a period of time. This tutorial is ideal for beginners with LEDs.If you landed here at this tutorial, chances are that you got everything but the LED strip.
10 Types of LED Lights and How to Choose
Next, they will learn how to connect an Arduino to the circuit and program it to blink the LEDs.In this project, we will make LEDs blink in different patterns in a random manner.value(0) When using the esp8266 board, the logic works in the opposite.Learn how to create an Arduino circuit with an LED, and power on this LED with code on the Arduino IDE. Introduction Unplugged Walkthrough Project . Students will also learn some best practices for building circuits, and how to debug and troubleshoot their circuits and code. When hooking up the circuit note the polarity of the LED. Exit the loop if user enters the sentinel . 👉 Complete Arduino .
LEDs with Arduino
Interfacing RGB LED Strip with Arduino with Fade & Color .
Arduino Project Hub
For a 75-watt replacement, look for a 10-1/2-watt LED with approximately 1,100 lumens.343k 125 598 638. for quick and dirty operations, you have 2 easy options: serial or parallel port. LED strips come in a range of colors and are often used to provide ambient lighting, accent lighting, or decorative lighting effects.Connect the short leg of the LED (the negative leg, called the cathode) to the GND. Augustine, Fla. If you do have the same LED Strip from this tutorial, the code and instructions will already match your needs.Read each character, one at a time. By Ian Buckley.Standing in the afternoon chill, the man, Max Azzarello, 37, of St.This post is about the WS2812B LED strip, which is an addressable RGB LED strip. You can include more patterns if you like. Let’s use an example for a strip with three LEDs, on which you .He arranged the 42 LED lights so that each branch of the snowflake would contain 7 LED lights.A LED strip, also known as LED tape or LED ribbon, is a flexible circuit board with surface-mounted LEDs that emit light. This library is designed for Arduino, ESP32, ESP8266.
Beginner's Guide to Using LED Strips with Arduino
You can try it yourself on the free online Arduino blink code simulator playground.Programming Tools.How to redeem the codes in Lost Light. Set the pin to LOW (0V), cutting the power to the LED and turning it off. Published Jul 6, 2018.how2electronics.Ready to start learning Arduino? In this tutorial, we'll show you how to get started with one of the most popular and simple Arduino projects: the LED blink. Jace used hot glue to attach the LED strand light to the paper so the wired lights can maintain the shape of the snowflake. Transmit the dots and dashes to the LED while transmitting the message to the Serial Monitor.
How to Program LED Holiday Lights With Raspberry Pi
For the programming process and subsequent control of the LED strips, you will need: An Arduino interface. Towards Data Science.
Using microPython on Thonny IDE to blink a built-in LED
For a 100-Watt incandescent, replace it with a 12-1/2-watt LED with about 1,600 lumens.👉 Complete Arduino Course for Beginners: 🔥 https://r.Do you want to create beautiful and realistic LED lights with CSS? Check out this CodePen CSS project that shows you how to use CSS properties and animations to make LED lights that can blink and change colors.Auteur : MakeUseOf
Blink two LEDs with Arduino
The Module has 2 potentiometers named X and Y. These three colors are all combined to produce the 16 million colors available. The detail instruction, code, wiring diagram, . The serial port is easier, but is limited in the number of LEDs. You will notice that the LED has a long . It’s really cool to control a long strip of lights with only a few lines of code. Finally, they will apply what they learned to make their own LED light show. Convert each Morse code sequence into the corresponding sequence of dots and dashes. The strip has 3 . Learn how to create an Arduino circuit with an LED, and power on this LED with code on the Arduino IDE.LED() “1” to control the red RGB LED segment, “2” to control the green RGB LED segment, “3” to control the blue RGB LED segment, and “4” to control the two IR LEDs.
Arduino LED Tutorial (step by step)
How To Program LED Lights
To turn the LED on, we need to send electric current to it.This tutorial teaches you to control LED using ESP32.In this episode of ABD TV, we are tackling the murky waters of LED bulbs, more specifically the hassles of the dreaded CANbus error codes.3K views 3 years ago #microbit #bbc #girls. This can make the wiring complex. Components Required: Arduino Pro Mini (or) Arduino Uno / Nano /Micro – Any One.
Arduino RGB LED Guide: Easy Setup and Code Examples
You can also customize the size, shape, and number of the lights to suit your design. You would have to look up the value for your resistor yourself. Breadboard – 1. It is designed for not only beginners but also experienced users. Copy the above code and open with Arduino IDE. >>> from machine import Pin >>> Pin(2, Pin. WS2812B light emitting diodes (LED) are individually addressable LEDs, making it possible to program individual LEDs. The timing of the signals is crucial to reliably control these strips.Regarder la vidéo7:21JLCPCB Prototype for $2(Any Color): https://jlcpcb.LED light programming allows you to use complex languages like Python, C/C++, or Arduino’s own language to control light aspects like patterns, brightness .7V LEDs didn't require a resistor because the 1.
Making a LED blink using the Raspberry Pi and Python
Active Dying Light code list.comCircuit Diagram:http://bit.
Simple Joystick Control With Leds
Setting up the Hardware. Fortunately, we can use the RGB LED module, which already has built-in current-limiting resistors. Here's a tutorial on doing it with a parallel port. Unlike typical holiday lights, these strips allow custom inputs for each LED.
Find the Best LED Lights for Your Home
We set up our LED lights like a snowflake.This tutorial teaches you to control LED using Arduino UNO or Genuino UNO. The only Thing I have done in the programming is to light up each led according to the X and Y values of the joystick Module.comArduino RGB LED Tutorial - The Geek Pubthegeekpub.Oh no! Both Python and Java on a Raspberry Pi can struggle with these timings as they are running on Linux, a . Though I would recommend an Arduino which can be purchased very cheaply and would .I used a Raspberry Pi to control individually addressable LED strips.
Getting Started with Arduino: The LED Blink Tutorial
That's the 5050 single color RGB type. To connect the LEDs, you need a shell connector (DB25/DB9) of the correct sex, the LED's and a resistor.Arduino LED – Complete Tutorial. Step 1: Head over to the Settings menu in the bottom left corner of . The IR sensor is a 1838B IR receiver.How to code a custom LED light show using Raspberry Pi.The following steps can be used to blink two LEDs using an Arduino: Connect the positive leg of the first LED to a digital output pin of the Arduino.Be sure to check out our Apex Legends codes guide and all the latest Coin Master free spins links. The detail instruction, code, wiring diagram, video tutorial, line-by-line code explanation are provided to help you quickly get started with ESP32.Set the pin to HIGH (5V), this will turn the LED on. To get started, gather all the .
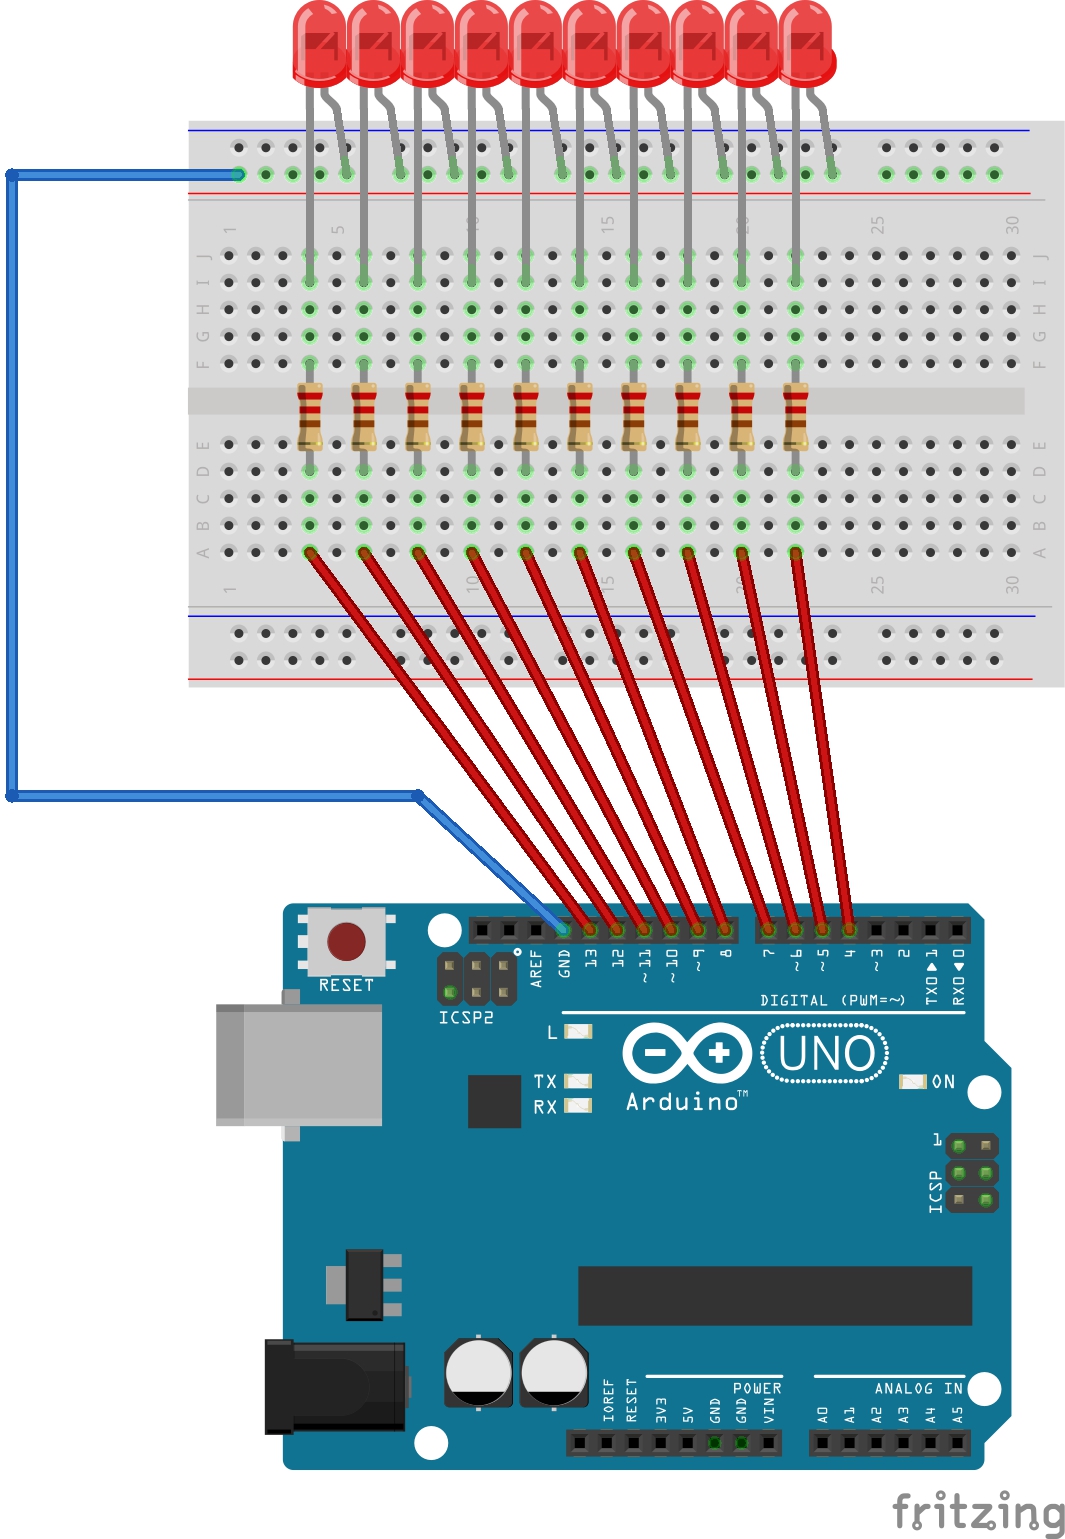
To find the right resistor use the resistor color code – for a 100 ohm resistor it needs to be brown-black-brown., threw pamphlets into the air before dousing himself with an accelerant and setting . For Example The maximum value each potentiometer can take is 1023, So in . First, you will setup your circuit with an Arduino board and an LED, and then discover different ways to control . We aim to answer . Click Upload button . Connect Arduino to PC via USB cable. (This set up is not pictured) Both of the 1.

Learn how to use ezLED library.RGB LED Light Colors.RGBCCT LED strip lights have six wires: one for each color (red, green, blue), two for white (warm and cool), and one for power (+ and -).This project is the most simple way to represent the functions of the joystick Module.
5 Ways to Blink an LED with Arduino
These strips are versatile and commonly used for decorative lighting in various applications.

Skip to main content Documentation Support .

Interoperability enhances the lighting experience, adds value through extended functionality, and pushes dynamic intelligent lighting into new application areas by .