Pro trinket pinouts

So while we still carry the Pro Trinket so that people can maintain some older projets, we no longer . Both ItsyBitsy 32u4's have BAT G USB on the top left, right next to the micro USB port.Pinouts PDF for Pro Trinket 5V PrettyPins Diagram (https://adafru. If you have a 5V Pro Trinket, In general, most 5V devices are OK with 3. It packs much of the same capability as an Arduino UNO.it/Xmb) PDF for Pro Trinket 3V PrettyPins Diagram (https://adafru.
7 wide, but has 6 power pins, 6 analog & digital pins and 17 digital pins.com/introducting-pro-trinketPro Trinket combines everything you love about Trinket with the familiarity of the core Arduino chip, the . If you want to power the Pro Trinket from a battery or power adapter or solar panel or any other kind of power source, connect the + (positive) . Platform Atmel AVR: .BUTTON, and in Arduino as BUTTON. Instead, use a transistor to power the DC motor on/off.

They are almost identical but there are slight differences in the pinouts: one has a 3V output pin in the top right, the other has a 5V output pin instead. On a 3V Pro Trinket, the GPIO are 3.3V output though. You can enter the bootloader mode by pressing the little button on the board with your fingernail. The bootloader will 'time out' after 10 seconds, so to re-enter the bootloader mode just re-press the button! If you have a 5V Pro Trinket,
Starting the Bootloader
All the GPIO pins .

Pro Trinket combines everything you love about Trinket with the familiarity of the core Arduino chip, the ATmega328.If you want to power the Pro Trinket from a battery or power adapter or solar panel or any other kind of power source, connect the + (positive) pin here! You can connect up to 16V .
Adafruit Trinket M0 Pinout
It is available in CircuitPython as board. If you want to power the Pro Trinket from a battery or power adapter or solar panel or any other kind of power source, connect the + (positive) pin here! You can connect up to 16V DC. The Display: Other than routers and rotary tools like a Dremel™, most shop machinery runs at 3,000 .
Adafruit Industries, Unique & fun DIY electronics and kits Adafruit Pro Trinket - 3V 12MHz : ID 2010 - Deprecation Warning: The Pro Trinket bit-bang USB technique it uses doesn't work as well as it did in 2014, many modern computers won't work well. Automate any workflow Packages.Pinouts There are two versions of the Pro Trinket: 3V and 5V. They are almost identical but there are slight differences in the pinouts: one has a 3V output pin in the top right, the other has a 5V output pin instead Power Pins We'll start with the top pins BAT+, USB+, 3V/5V, and GND BAT+ is the Battery + Input pin.Each pad can provide up to ~7mA of current. If the Trinket is in a box or otherwise hard to get to, you can wire up a button to this pin for an external reset button. If you want to power the Pro Trinket from a battery or power adapter or solar panel or any other kind of power source, connect the + . GND - Power/data ground.3V output level, and should not be used with 5V inputs. 78K views 9 years ago.Adafruit Pro Trinket 5V/16MHz (USB) Contents. On a Trinket M0, the GPIO are 3.
Manquant :
pro trinketSetting up Arduino IDE
Up to 16V input, reverse-polarity protection, thermal and current-limit protection. Skip to content. We’ll use the i2c interface to drive a 7-segment led display, and the external interrupt on pin 3 as a trigger for timing the revolutions.Pro Trinket combines everything you love about Trinket with the familiarity of the common core Arduino chip, the ATmega328.3V or 5V output for powering LEDs, .There are two versions of the Pro Trinket: 3V and 5V.5V
Adafruit-Trinket-PCB/Adafruit
Introducting Pro Trinket
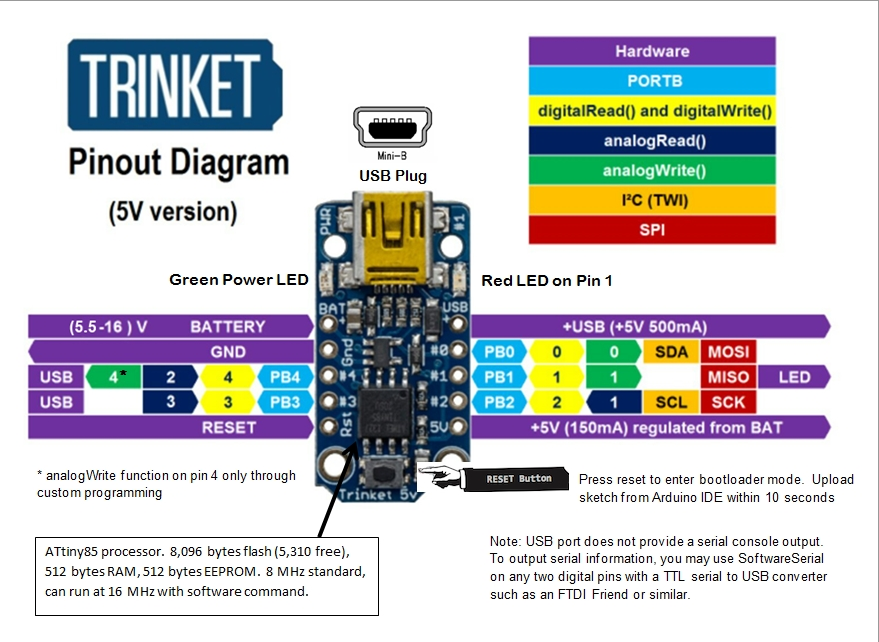
These pins are: BAT - battery input for an alternative power source to USB. Adafruit pro trinketOptimized to speed time to market-and easily adapt to new ones-they are . Sign in Product Actions.For beginners, we suggest using an FTDI cable for programming and debugging, especially if you aren't simply porting an existing Arduino project to Pro . If you want to power the Pro Trinket .The Pro Trinket uses the same core chip as Arduino UNO, and the 5V Pro Trinket uses the same clock rate and voltage so its pretty much a full Arduino . The Trinket must be connected to a computer via a USB cable to enter bootloader mode.Pinouts PDF for Pro Trinket 5V PrettyPins Diagram () PDF for Pro Trinket 3V PrettyPins Diagram () There are two versions of the Pro Trinket: 3V and 5V. ©Adafruit Industries Page 8 of 16. Instant dev environments Copilot.Pinout of Pro Trinket board: RX - also known as Digital #0, this is the hardware serial input pin.Trinket may be small, but do not be fooled by its size! It's a tiny microcontroller board, built around the Atmel ATtiny85, a little chip with a lot of power. All of the I/O pins can be used for 12-bit analog input.GPIO! - 5 GPIO pins, at 3 or 5V logic, check the next section for a detailed pinout guide 3 or 5V output - an onboard regulator provides 3.it/Xmc) There are two versions of the Pro Trinket: 3V and 5V. TX - also known as Digital #1, this is the hardware serial output pin. They are almost identical but there are slight differences in the pinouts: one has a 3V output pin in the top right, the other has a 5V output pin instead Digital 3 - this . On the 5V itsy, this pin can be 5.Trinket on the road. It's like an Arduino Pro Mini with more pins and USB tossed in, so delicious. Contribute to adafruit/Adafruit-Trinket-PCB development by creating an account on GitHub. Find and fix vulnerabilities Codespaces. You can read it on pin GPIO 35.Table of Contents
Pinouts
Contribute to adafruit/Adafruit-Pro-Trinket-PCBs development by creating an account on GitHub.Pinouts Power Pins GPIO Pins Logic Level The Digital Only GPIO Pins The Analog/Digital GPIO Pins The Analog only pins Other Pins FTDI Breakout Using the USB Bootloader About the bootloader Pro Trinket USB Drivers for Windows Special Notes on using Pro Trinket with Linux How to start the USB bootloader Using FTDI Cables Select the .PCB files for Adafruit Pro Trinket.

Auteur : Adafruit IndustriesPCB files for Adafruit Trinket 3V & 5V.
Pro Trinket Tachometer
Trinket pinout adafruit 5v attiny85 introducing pinouts spi analog i2c 3v tree christmas pwm output jpralves assets workshopshed learn fileHow to use the adafruit pro trinket board Microcontroller pin functions – itp physical computingTrinket pinout adafruit 3v attiny85 pinouts introducing. On the 3V Itsy, we have a different regulator, so the voltage can only be from 3.{payload:{allShortcutsEnabled:false,fileTree:{:{items:[{name:assets,path:assets,contentType:directory},{name:Adafruit Pro Trinket 3v3. On a 5V Pro Trinket, the GPIO are 5V . That's why we designed Pro Trinket, with 18 GPIO, 2 extra analog .
Overview
Perfect for when you don't want to give up . We wanted to design a microcontroller board that was small enough to fit into any project, and low cost enough to use without hesitation.We’re using a Pro Trinket here because it is inexpensive, small and easy to work with.GPIO pins - 18 GPIO pins + 2 analog-only pins, at 3 or 5V logic, check the next section for a detailed pinout guide 3 or 5V output - an onboard regulator provides . Sometimes you just need more pins, more FLASH, and more RAM.
Downloads
Pro Trinket combines everything you love about .Adafruit Industries, Unique & fun DIY electronics and kits Adafruit Pro Trinket - 5V 16MHz : ID 2000 - Deprecation Warning: The Pro Trinket bit-bang USB technique it uses doesn't work as well as it did in 2014, many modern computers won't work well.the Pro Trinket uses the same core chip as an Arduino, nearly any existing project that uses special pins like hardware PWM or SPI will work 'out of the box'.
Introducing Pro Trinket
Although it's called an FTDI header you can use any USB-serial adapter that has a compatible pinout. If you have a 3V Pro Trinket, you'll want at least 3. You just need to select the port of the FTDI board/cable from the Tools > Port menu. They are almost identical but there are slight differences in the pinouts: one has a 3V output pin in the top right, the other has a 5V output pin instead ©Adafruit Industries Page 9 of 37. If you have a 5V Pro Trinket, 5.There are two buttons on the ItsyBitsy ESP32: User Switch - This is a user readable button switch to use as an input, labeled U on the silk. You can get the CH340 for a bit cheaper than the FT232 and the cheap FT232 are counterfeits so you might need to jump through some hoops to get the .The Pro Trinket must be connected to a computer via a USB cable to enter bootloader mode.When the Trinket is in bootloader mode, the red LED will be pulsing.
Manquant :
Host and manage packages Security.
Platform Atmel AVR: Atmel AVR 8-bit MCUs deliver a unique combination of performance, power efficiency and design flexibility.
How to Use the Adafruit Pro Trinket Board
Toggle navigation.Regarder la vidéo3:03https://learn.